Tank Monitors and Accessories | Mounting Equipment: The Complete 2026 Guide
Looking for the right mounting equipment for your propane tank monitor? This comprehensive guide covers everything you need to know-from mounting brackets and straps for steel and fiberglass tanks, to weatherproof enclosures, sensor mounting hardware, magnetic mount adapters, riser pipe accessories for underground tanks, and how to choose the correct mounting equipment for Generac, Mopeka, SmartTank Pro, and DIY ESPHome propane monitoring systems.
Tank Monitors and Mounting Equipment: Quick Answer
The short answer: Mounting equipment for propane tank monitors includes mounting brackets, straps, magnetic adapters, weatherproof enclosures, riser pipe hardware, sensor mounts, and leveling devices. The right mounting equipment depends on your tank type (steel or fiberglass), tank orientation (horizontal or vertical), tank location (above-ground or underground), and monitor model (Generac 7009 LTE, Mopeka Pro Check, SmartTank Pro, or DIY ESPHome). Using the correct mounting hardware ensures accurate readings, a secure installation, and a weatherproof seal that lasts for years.
Why it matters: A propane tank monitor is only as good as its installation. Even the most advanced sonar sensor will give inaccurate readings if it's mounted at the wrong angle, on a dirty surface, or in a position where vibration loosens it over time. The $10–50 you spend on proper mounting equipment is the difference between a monitor that lasts 10 years and one that drifts, fails, or falls off within two years. This guide covers every type of mounting equipment available for every major propane tank monitor so you can install your system correctly the first time.
Understanding Your Tank Type and Mounting Requirements
Tank Classification and What It Means for Mounting
Before choosing mounting equipment, you need to identify your tank type, size, and location. Different tanks require different mounting approaches:
By tank material:
| Tank Material | Mounting Options | Notes |
|---|---|---|
| Steel (residential and RV) | Magnetic mount, bolt-on bracket, hose clamps | Most common; magnetic works on clean flat steel |
| Fiberglass/composite | Bolt-on bracket only | No magnetic mount; brackets required |
| Aluminum | Magnetic mount (weak), bolt-on bracket | Magnetic hold is weaker than steel |
Steel tanks are the most common in residential use (home heating, grilling, RVs). The Generac 7009 LTE's magnetic mount is designed specifically for clean, flat steel surfaces. If you have a steel tank, this is your easiest mounting option.
By tank orientation:
| Orientation | Common Sizes | Mounting Location |
|---|---|---|
| Horizontal cylindrical | 100–1,000 gallons | Bottom center of tank (6 o'clock position) |
| Vertical cylindrical | 120–1,000 gallons | Bottom center of tank base |
| Above-ground cylinder (upright) | 20–100 pounds | Bottom of cylinder, near base |
| Underground | Any size | At riser pipe above ground |
By installation location:
| Location | Challenges | Required Accessories |
|---|---|---|
| Above-ground, accessible | Weather, vibration, temperature | Standard mount + weatherproofing |
| Underground | Dirt, moisture, limited access | Riser pipe mount + sealed enclosure |
| RV/mobile | Vibration, travel, multiple tanks | Vibration-resistant mount + portable options |
| Remote/unpowered | No AC power | Solar mount + battery enclosure |
Magnetic Mounting Equipment
When and How to Use Magnetic Mounts
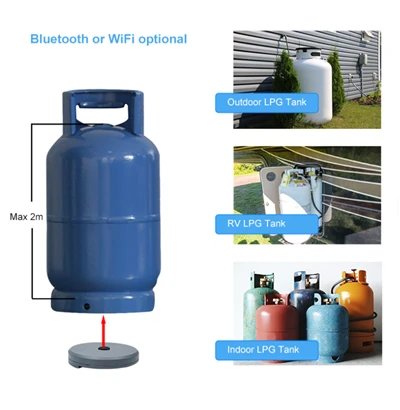
The Generac 7009 LTE uses a built-in rare-earth magnetic mount designed for quick, tool-free installation on steel propane tanks. Here's everything you need to know:
Built-in magnetic mount (Generac 7009 LTE):
Type: Integrated rare-earth neodymium magnet
Holding force: Approximately 40–50 lbs pull force
Tank compatibility: Clean, flat, steel surfaces only
Installation: Place label-up on bottom center of tank
Tools needed: None
Installation time: Under 2 minutes
When the built-in magnet isn't enough:
Magnetic mount adapter plates (for weak magnetic hold):
Steel adapter plate ($15–30) that you mount with straps or bolts first
The Generac monitor then magnetically attaches to the plate
Gives a stronger hold on curved or slightly uneven surfaces
Useful for tanks with powder-coated finishes that reduce magnetic strength
Magnetic mount strengthening kits:
Multiple rare-earth magnets in a housing ($20–40)
Attaches to the tank first with hose clamps
The monitor then magnetically attaches to the kit
Provides 2–4× the holding force of the built-in magnet
Best magnetic mounting practices:
| Do | Don't |
|---|---|
| ✅ Clean the tank surface with alcohol wipe first | ❌ Mount on rusty, flaking, or uneven surfaces |
| ✅ Ensure full magnetic contact (no gaps) | ❌ Mount on painted surfaces that aren't fully bonded to steel |
| ✅ Apply firm downward pressure when mounting | ❌ Mount where water pools or ice accumulates |
| ✅ Check the hold periodically (first week) | ❌ Use on fiberglass or composite tanks |
| ✅ Position label facing up | ❌ Mount upside down or sideways |
Bolt-On Brackets and Sensor Mounts
Permanent Mounting Solutions for All Tank Types
Bolt-on brackets provide the most secure and permanent mounting solution, compatible with both steel and fiberglass tanks:
Universal sensor mounting brackets ($15–35):
Steel or aluminum bracket with pre-drilled holes
Mounts at the tank's monitoring port using the existing threaded fitting
Compatible with Mopeka Pro Check, SmartTank Pro, and similar bolt-on sensors
Includes gasket or O-ring seal for weatherproofing
How they work:
Remove the existing plug/cap from the tank's 1/2" or 3/4" monitoring port
Apply Teflon tape to the bracket's threaded fitting
Thread the bracket into the port (hand-tight, then 1/4–1/2 turn with wrench)
Attach the sensor to the bracket per manufacturer instructions
Seal with gasket or O-ring
Tank monitoring port adapters ($10–25):
Adapters that convert one port size to another
Essential when your monitor's port size doesn't match your tank's existing port
Common sizes: 1/2" NPT to 3/4" NPT, 3/4" NPT to 1" NPT
Material: Brass or stainless steel (propane-compatible)
Universal tank straps with sensor mounts ($20–50):
Heavy-duty steel straps that wrap around the tank
Integrated sensor mount bracket attached to the strap
Works on any tank without needing to tap existing ports
Ideal for fiberglass tanks (no magnetic mount) or tanks without accessible ports
Installed with a tensioning tool or ratchet mechanism
Weatherproof Enclosures
Protecting Your Electronics Outdoors
All outdoor propane tank monitoring equipment needs weatherproof enclosures. Here are your options:
IP65/IP67 waterproof enclosures ($10–30):
Plastic or metal housing rated for outdoor use
IP65: Dust-tight and protected against water jets
IP67: Dust-tight and submersible in water up to 1 meter
Sizes range from small (fits ESP32 + sensor) to large (fits full electronics)
Includes gasket seal and mounting holes
Choosing the right enclosure size:
| Monitor Type | Enclosure Size Needed | Typical Dimensions |
|---|---|---|
| ESP32 + sonar sensor | Small | 4" × 3" × 1.5" |
| SmartTank Pro + cables | Medium | 6" × 4" × 2" |
| Cellular module + battery | Large | 8" × 6" × 3" |
| Full DIY system (solar controller + ESP32 + battery) | Extra large | 12" × 8" × 4" |
NEMA-rated enclosures ($20–80):
NEMA 4: Indoor/outdoor, watertight against rain and hose-directed water
NEMA 4X: NEMA 4 + corrosion-resistant (coastal areas)
NEMA 6/IP67: submersible, for flooded or buried applications
Metal enclosures provide EMI/RFI shielding for sensitive electronics
Required for underground or buried monitoring installations
Enclosure accessories:
| Accessory | Cost | Purpose |
|---|---|---|
| Cable glands ($3–8) | $5–15/pack | Waterproof cable entry points |
| Din rail mounting ($5–10) | $5–10 | Mount circuit boards inside enclosure |
| Ventilation plugs ($5–10) | $5–10 | Prevent moisture buildup (breather vent) |
| Mounting flanges ($10–20) | $10–20 | Surface mounting to walls, poles, tanks |
| Padlock hasps ($5–10) | $5–10 | Security against tampering |
Underground Tank Mounting Equipment
Riser Pipes, Extensions, and Ground-Level Access
Mounting a monitor on an underground propane tank requires additional hardware to bring the monitoring point from the buried tank to ground level:
Riser pipes ($20–80):
Vertical pipe that extends the underground tank's monitoring port above ground
Standard sizes: 1.5" or 2" diameter
Material: Steel or plastic (propane-rated)
Length: Varies from 6" to 24" depending on burial depth
Connects to the tank's existing top port via threaded fitting
Riser pipe installation (requires a propane technician):
Propane technician excavates around the tank's top
Removes the existing tank fitting
Installs the riser pipe with proper sealant and threading
Re-seals and tests for leaks
Backfills the excavation
Riser pipe caps and flanges ($10–25):
Threaded caps that close the top of the riser pipe when not in use
Flanges that provide a flat mounting surface at ground level
Used when mounting a monitor at ground level rather than directly on the buried tank
Underground monitoring station kits ($50–150):
Complete kits including riser extension, weatherproof enclosure, and sensor mount
Designed specifically for underground propane tank monitoring
Include all hardware needed for above-ground installation
Simplest option for adding monitoring to an existing underground tank
Underground tank monitoring considerations:
The sonar sensor goes at the underground port (buried)
The electronics/enclosure go above ground (accessible, better cellular signal)
Cable routing through the riser pipe must be fully sealed
Use IP67 or NEMA 6 rated components throughout
Solar Mounting Equipment
Powering Remote Tank Monitors Without AC Power
For propane tanks far from any power source, solar power is the solution. Here are the mounting components you need:
Solar panel mounting kits ($20–80):
Pole mounts, wall mounts, or tank-strap mounts for solar panels
Adjustable angle mounts (for optimizing panel orientation)
Material: Aluminum or galvanized steel (outdoor-rated)
Support panel sizes from 5W to 100W+
Solar power kits for tank monitoring ($40–150):
Complete kits including solar panel, charge controller, battery, and enclosure
Pre-wired and tested for easy installation
Sizes: 5W kit (small), 10W kit (medium), 20W+ kit (full system)
Complete solar kit component breakdown:
| Component | Purpose | Typical Spec |
|---|---|---|
| Solar panel | Charges battery | 10–50W, 12V output |
| Charge controller | Prevents overcharging | 10–20A, PWM or MPPT |
| 12V battery | Stores power | 7–18Ah sealed lead-acid or LiFePO4 |
| Enclosure | Houses battery and controller | IP65 or NEMA 4 |
| Cables and connectors | Wiring everything together | Weatherproof MC4 connectors |
Solar mounting tips for propane tanks:
Mount solar panel facing south (Northern Hemisphere) for maximum sun exposure
Angle panel at latitude + 15° for winter optimization (most critical season)
Position panel above typical snow line in cold climates
Use bird deterrents (spikes or plastic owls) to prevent nesting
Vibration and Shock Mounts
Protecting Monitors on RVs and Mobile Applications
RV propane tanks and mobile monitoring applications face unique challenges: vibration from travel can loosen mounts and damage sensors over time.
Vibration dampening mounts ($15–40):
Rubber or silicone vibration isolators between the mount and tank
Reduces vibration transfer by 60–80%
Essential for any tank monitor on a travel trailer, fifth wheel, or motorhome
Extends monitor and sensor lifespan significantly
How they work:
Mounting hardware passes through the vibration dampener
Rubber/silicone absorbs vibration energy
The monitor experiences significantly less shaking during travel
Result: No loosened mounts, no damaged sensors, no failed readings
Strap-style RV mounts ($20–35):
Heavy-duty nylon or steel straps with integrated sensor brackets
Straps around the RV propane tank cylinder
Sensor bracket attached to the strap
Adjustable for different cylinder sizes (20–40 lb)
Removable for tank exchange (like the propane cylinder swap at a gas station)
Best for: RV owners who swap propane cylinders frequently and want quick-release mounting.
Leveling and Positioning Tools
Ensuring Accurate Monitor Readings
The angle of your sonar sensor affects reading accuracy. Here are tools to get it right:
Bubble levels and angle finders ($5–15):
Small bubble level that attaches to the monitor or mounting surface
Ensures the sensor is perfectly level for accurate sonar readings
Critical for tanks on uneven ground or slopes
A sensor tilted more than 5° can give readings off by 5–10%
Digital angle finders ($15–30):
More precise than bubble levels (accurate to 0.1°)
Can be zeroed and set to measure any angle
Useful for tanks with curved or irregular mounting surfaces
Tank bottom leveling pads ($10–20):
Self-leveling mounting pads placed between the tank and ground
Ensures the tank sits level (horizontal tanks must be level for accurate sonar readings)
Particularly useful for tanks on uneven ground or gravel surfaces
Prevents the tank from slowly shifting or settling over time
Mounting Equipment by Monitor Model
The Right Hardware for Each System
Generac 7009 LTE mounting equipment:
| Accessory | Price | Purpose |
|---|---|---|
| Built-in magnetic mount | Included | Primary mounting method |
| Magnetic adapter plate | $15–30 | For curved or powder-coated surfaces |
| Strap-style adapter | $20–35 | For composite tanks or added security |
| Underground monitoring kit | $75–150 | For buried tank installations |
| External cellular antenna | $30–60 | For weak signal areas |
Mopeka Pro Check / Pro+ mounting equipment:
| Accessory | Price | Purpose |
|---|---|---|
| Bolt-on sensor mount bracket | $15–30 | Primary mounting (at tank port) |
| Threaded port adapters | $10–25 | For non-standard port sizes |
| Weatherproof enclosure | $10–30 | For cellular module and battery |
| Vibration dampening mount | $15–40 | For RVs and mobile use |
SmartTank Pro WiFi mounting equipment:
| Accessory | Price | Purpose |
|---|---|---|
| Bolt-on sensor bracket | $15–30 | Attaches to tank monitoring port |
| IP65 weatherproof enclosure | $10–30 | Houses WiFi module |
| Cable glands and seals | $5–15 | Waterproof cable routing |
| Din rail components | $10–20 | Interior mounting for electronics |
DIY ESPHome mounting equipment:
| Accessory | Price | Purpose |
|---|---|---|
| IP65/NEMA 4 enclosure | $10–30 | Houses ESP32 and electronics |
| Cable glands | $5–15 | Weatherproof cable entry |
| Mounting flange or bracket | $10–20 | Surface or pole mounting |
| Vibration dampeners | $15–40 | For RV applications |
| Solar mount kit | $20–80 | For remote power |
Frequently Asked Questions
Q1: What mounting equipment do I need for the Generac 7009 LTE?
A: The Generac 7009 LTE includes its own built-in rare-earth magnetic mount, so you don't need to buy additional mounting equipment for most installations. Here's what you might need:
Included in the box: ✅ Magnetic mount (built-in)
Commonly purchased accessories:
Magnetic adapter plate ($15–30): If your tank has a powder-coated finish or slightly curved surface that reduces magnetic hold
Underground monitoring kit ($75–150): For underground propane tanks
External cellular antenna ($30–60): For areas with weak cellular signal
If you have a fiberglass tank: The Generac 7009 LTE magnetic mount won't work. You'll need a bolt-on bracket system, but note that the Generac 7009 LTE is not designed for bolt-on installation-you'd need to contact Generac or a compatible third-party adapter.
Recommendation: Start with just the monitor. The built-in magnet is sufficient for most residential steel tanks. Buy additional equipment only if you encounter specific challenges (weak hold, underground tank, fiberglass tank).
Q2: Can I use the same mounting equipment for steel and fiberglass tanks?
A: No-steel and fiberglass tanks require different mounting equipment:
| Tank Type | Mounting Method | Compatible Equipment |
|---|---|---|
| Steel tank | Magnetic mount | ✅ Built-in Generac magnet, magnetic adapters |
| Steel tank | Bolt-on bracket | ✅ Universal sensor brackets, straps |
| Fiberglass tank | Bolt-on bracket only | ❌ No magnetic mount works reliably |
| Aluminum tank | Magnetic (weak) or bolt-on | Bolt-on recommended |
Fiberglass tanks are becoming more common, especially for above-ground residential installations in some regions. Since fiberglass isn't magnetic, you need bolt-on brackets. The Mopeka Pro Check and SmartTank Pro are designed for bolt-on installation and work on both steel and fiberglass tanks.
Q3: How do I mount a propane tank monitor underground?
A: Mounting a monitor on an underground propane tank requires a multi-component setup:
Components needed for underground tank monitoring:
Riser pipe ($20–80): Extends the buried tank's monitoring port to ground level. Must be installed by a licensed propane technician.
Underground monitoring station ($50–150): Weatherproof enclosure mounted at ground level
Sonar sensor: Mounts at the underground port via the riser pipe
Electronics enclosure: Mounts above ground in the monitoring station
Sealed cable routing: Waterproof conduit from underground sensor to above-ground electronics
Cellular or extended WiFi: For connectivity underground
Installation steps:
Hire a propane technician to install or verify a riser pipe ($100–200)
Install the sonar sensor at the underground port (via riser)
Route sensor cables through sealed conduit to ground level
Mount weatherproof enclosure at ground level
Install electronics (monitor module, cellular or WiFi) inside enclosure
Connect power (solar recommended for underground locations)
Q4: What accessories do I need for a DIY ESPHome propane tank monitor?
A: A DIY ESPHome propane tank monitor needs more mounting equipment than a commercial product because you're assembling multiple components:
Complete accessories list for DIY ESPHome:
| Component | Price | Mounting Purpose |
|---|---|---|
| IP65/NEMA 4 enclosure | $10–30 | Houses ESP32 and sonar sensor |
| Cable glands | $5–15 | Waterproof cable entry (2–4 per enclosure) |
| Din rail | $5–10 | Mounts ESP32 and circuit boards inside enclosure |
| Mounting bracket/flange | $10–20 | Attaches enclosure to tank, pole, or wall |
| Vibration dampeners | $15–40 | For RV applications |
| Solar mount kit | $20–80 | For remote/off-grid power |
| Cable ties and mounts | $5–10 | Secures wiring and sensor |
| Total | $55–205 |
This is one area where commercial monitors have an advantage-they come with integrated mounting solutions. DIY requires sourcing individual components.
Q5: Do propane tank monitors come with mounting hardware?
A: It depends on the monitor:
| Monitor | Mounting Hardware Included? | Notes |
|---|---|---|
| Generac 7009 LTE | ✅ Yes (built-in magnetic mount) | Magnetic mount integrated into unit |
| Mopeka Pro Check | ✅ Yes (bolt-on bracket) | Mounting hardware included |
| Mopeka Pro+ Cellular | ✅ Yes (bolt-on bracket) | Sensor mount included |
| SmartTank Pro WiFi | ✅ Yes (bolt-on bracket) | Mounting hardware included |
| DIY ESPHome | ❌ No | Must source all components separately |
| Generic ultrasonic kits | ❌ No | Mounting sold separately |
Always check the product listing before purchasing to confirm what mounting hardware is included. Most commercial propane tank monitors include the sensor mounting bracket; the Generac 7009 LTE includes the magnetic mount; DIY solutions require separate purchases.
Q6: How do I prevent my tank monitor from vibrating loose on an RV?
A: RV propane tank monitors face constant vibration from travel, which can loosen mounts and damage sensors over time. Here's how to prevent it:
Step 1: Use vibration dampening mounts
Install rubber or silicone vibration isolators between the mount and the tank
Reduces vibration transfer by 60–80%
Cost: $15–40
Step 2: Use thread-locking compound
Apply medium-strength thread-locker (blue Loctite) to all threaded connections
Prevents bolts and screws from vibrating loose
Reapply annually during maintenance
Step 3: Use lock washers
Star washers or split-lock washers under all nuts and bolts
Creates constant pressure that resists vibration loosening
Step 4: Check regularly
Inspect all mounting points after every 2–3 trips
Tighten any loose hardware immediately
Replace any worn or compressed vibration dampeners
Step 5: Consider quick-release straps
For tanks you swap frequently, use quick-release strap mounts
Secure during travel, quick to remove for tank exchange
Q7: What is the best way to mount a solar panel for a remote tank monitor?
A: The best solar mount depends on your tank location and available surfaces:
Best mounting options for solar panels on propane tanks:
| Mount Type | Cost | Best For | Pros | Cons |
|---|---|---|---|---|
| Tank-strap mount | $20–40 | Anywhere on the tank body | No drilling, adjustable | Limited to small panels |
| Pole mount | $30–60 | Away from tank | Best angle control, unobstructed sun | Requires separate pole |
| Ground mount | $20–50 | Near tank, on the ground | Easy installation, angled optimally | Takes up space |
| Wall mount | $25–50 | Near buildings | Stable, easy wiring | Requires nearby wall |
Best practices:
Size: 10–20W solar panel is sufficient for most tank monitor setups
Orientation: Face south in the Northern Hemisphere
Angle: Set at latitude + 15° for winter optimization
Height: Mount above snow line in cold climates
Shading: Ensure no shadows fall on the panel during peak sun hours
Q8: Can I use plumbing hardware from a hardware store for propane tank monitor mounting?
A: Yes and no-some plumbing hardware works, but you must be careful:
Safe to use (with propane compatibility):
✅ Teflon tape: Standard PTFE thread seal tape works for propane tank fittings
✅ Brass fittings: Brass is propane-compatible and readily available
✅ Stainless steel hardware: SS bolts, nuts, and washers are propane-safe
✅ Pipe thread sealant: Propane-rated compounds (yellow or pink)
NOT safe for propane tanks:
❌ PVC fittings: Not rated for propane (use brass or steel)
❌ Rubber O-rings not rated for propane: Use propane-compatible O-rings
❌ Teflon paste or compounds not rated for propane: Use propane-specific sealants
❌ ** galvanized steel fittings**: Can corrode; use brass or stainless steel
Key rule: Any hardware that comes into contact with propane or propane vapor must be rated for LP gas/propane service. Standard plumbing hardware rated for water or air may not be safe for propane.
Q9: What tools do I need to install tank monitor mounting equipment?
A: The tools you need depend on your mounting method:
For magnetic mount (Generac 7009 LTE): No tools required-just a clean cloth for surface prep.
For bolt-on bracket mounting:
| Tool | Purpose | Approximate Cost |
|---|---|---|
| Adjustable wrench or channel-lock pliers | Tightening fittings | $10–20 |
| Socket wrench set | Bolts and nuts | $20–50 |
| Teflon tape | Thread sealing | $3–5 |
| Level (small bubble) | Ensuring level mounting | $5–15 |
| Alcohol wipes | Cleaning tank surface | $5 (pack) |
| Flashlight/headlamp | Working in dark/crowded spaces | $10–30 |
For DIY ESPHome systems (additionally):
| Tool | Purpose | Approximate Cost |
|---|---|---|
| Wire strippers/crimpers | Wiring connections | $10–30 |
| Screwdriver set | Assembling enclosure | $10–20 |
| Drill | Mounting enclosure and brackets | $30–100 |
| Drill bits | Creating cable entry holes | $5–15 |
| Silicone sealant | Waterproofing | $5–10 |
Total tool investment: $25–50 for basic bolt-on installation. $75–150 if you need to buy a drill and socket set.
Q10: How much does all the mounting equipment cost?
A: Total mounting equipment costs range from $0 to $300+ depending on your setup:
| Installation Type | Equipment Cost | What's Included |
|---|---|---|
| Generac 7009 LTE on steel tank | $0–30 | Nothing extra needed for most setups |
| Generac 7009 LTE underground | $75–150 | Underground monitoring kit, external antenna |
| Mopeka Pro Check bolt-on | $0–20 | Thread adapters if needed |
| SmartTank Pro WiFi | $0–30 | Weatherproof enclosure if needed |
| DIY ESPHome (WiFi available) | $55–150 | Enclosure, glands, brackets, mounts |
| DIY ESPHome (solar powered) | $100–300 | Above + solar panel, battery, charge controller |
| RV vibration-resistant | $20–50 | Vibration dampeners, lock washers |
Tip: Start with the minimum. Most residential steel tank installations need nothing beyond what comes in the box. Add equipment only when you encounter a specific need (underground tank, RV, remote location, fiberglass tank).
Conclusion: Choosing the Right Mounting Equipment
Mounting equipment is the foundation of a reliable propane tank monitoring system. Here's the quick reference guide:
| Situation | Mounting Equipment Needed |
|---|---|
| Steel tank, above ground, Generac 7009 LTE | ✅ Nothing extra needed |
| Steel tank, above ground, Mopeka/SmartTank | ✅ Bolt-on bracket (usually included) |
| Fiberglass tank | Bolt-on bracket (required) + port adapters |
| Underground tank | Riser pipe + underground monitoring station + weatherproof enclosure |
| RV or mobile tank | Vibration dampeners + quick-release straps |
| Remote location, no AC power | Solar panel kit + battery enclosure |
| DIY ESPHome system | IP65/NEMA 4 enclosure + cable glands + mounting bracket |
The most important principle: The best monitor in the world is worthless if it falls off your tank. Invest $10–50 in proper mounting equipment, follow manufacturer guidelines, and check your installation after the first week and every six months thereafter. A properly mounted propane tank monitor provides accurate readings for 5–10+ years without intervention.
Last updated: July 2026
Disclaimer: This guide provides general information about propane tank monitor mounting equipment for educational purposes. Always follow manufacturer-specific installation instructions for your monitor model. Propane tank modifications should be performed by licensed propane technicians. Verify that all hardware is rated for propane/LP gas service before use.